Table of Contents
Ever dreamt of perfectly golden, fluffy pancakes, the kind that make weekend mornings feel like a warm hug? You're not alone! Many of us crave that classic breakfast treat, but sometimes, the execution falls flat. Maybe they're too dense, too pale, or just plain sad-looking. The secret to achieving those picture-perfect pancakes isn't some complicated chef technique, it’s all about mastering the art of the griddle. This article will guide you through every step of making a truly amazing classic pancake recipe using a griddle. We'll start with the essential setup, from choosing the right griddle to preparing the surface. Then, we’ll get into the nitty-gritty of mixing the batter for that perfect consistency. You'll learn the best griddling techniques for achieving that beautiful golden-brown color and those fluffy interiors. Finally, we'll explore how to serve and enjoy your creations. Get ready to elevate your pancake game and become a griddle master!
The Essential Griddle Setup for Pancakes
The Essential Griddle Setup for Pancakes
Okay, so you're ready to make some killer pancakes, that's awesome! But before you even think about whisking anything, let's talk about your griddle. It's the unsung hero of the pancake world, and choosing the right one is key. You've got a few options here: a dedicated electric griddle, a cast iron skillet, or even a non-stick pan. Each has its perks, but I'm a big fan of cast iron for its even heat distribution and those gorgeous golden-brown edges. Think of it as your pancake canvas. If you're using a skillet, make sure it's nice and flat, no wobbles allowed. A wobbly pan means uneven cooking, and nobody wants a half-raw pancake.
Once you've got your griddle sorted, it's all about the heat. You want a medium-low heat to start. It might seem slow, but trust me, patience is a virtue when it comes to pancakes. If the heat is too high, you’ll end up with burnt exteriors and raw middles, and we definitely want to avoid that. Think of it like a gentle simmer, not a raging boil. Before you start cooking, give your griddle a light coating of oil, butter, or even a little lard. This helps create that perfect golden-brown crust and prevents sticking. If you're a beginner, you might find our best classic pancake recipe for beginners helpful, it covers the basics really well.
Griddle Type | Pros | Cons |
|---|---|---|
Electric Griddle | Consistent heat, large cooking surface | Can be bulky, may not get as hot |
Cast Iron Skillet | Excellent heat retention, creates crispy edges | Takes longer to heat up, requires seasoning |
Non-Stick Skillet | Easy to clean, heats up quickly | May not distribute heat as evenly, can scratch easily |
Also, make sure your griddle is clean before starting. Nobody wants last night's dinner flavors sneaking into their pancakes. A quick wipe down with a damp cloth or paper towel should do the trick. Remember, the goal is to create a smooth, even surface for your batter to dance on. Once you've got your griddle prepped, you're one big step closer to pancake heaven. Now, you might be wondering if you need a special recipe for this, but the truth is, many recipes work great on a griddle. If you're curious about how different recipes stack up, check out this classic buttermilk pancake recipe comparison. It's really helpful to see how variations can impact your final result.
Mixing the Perfect Pancake Batter
Mixing the Perfect Pancake Batter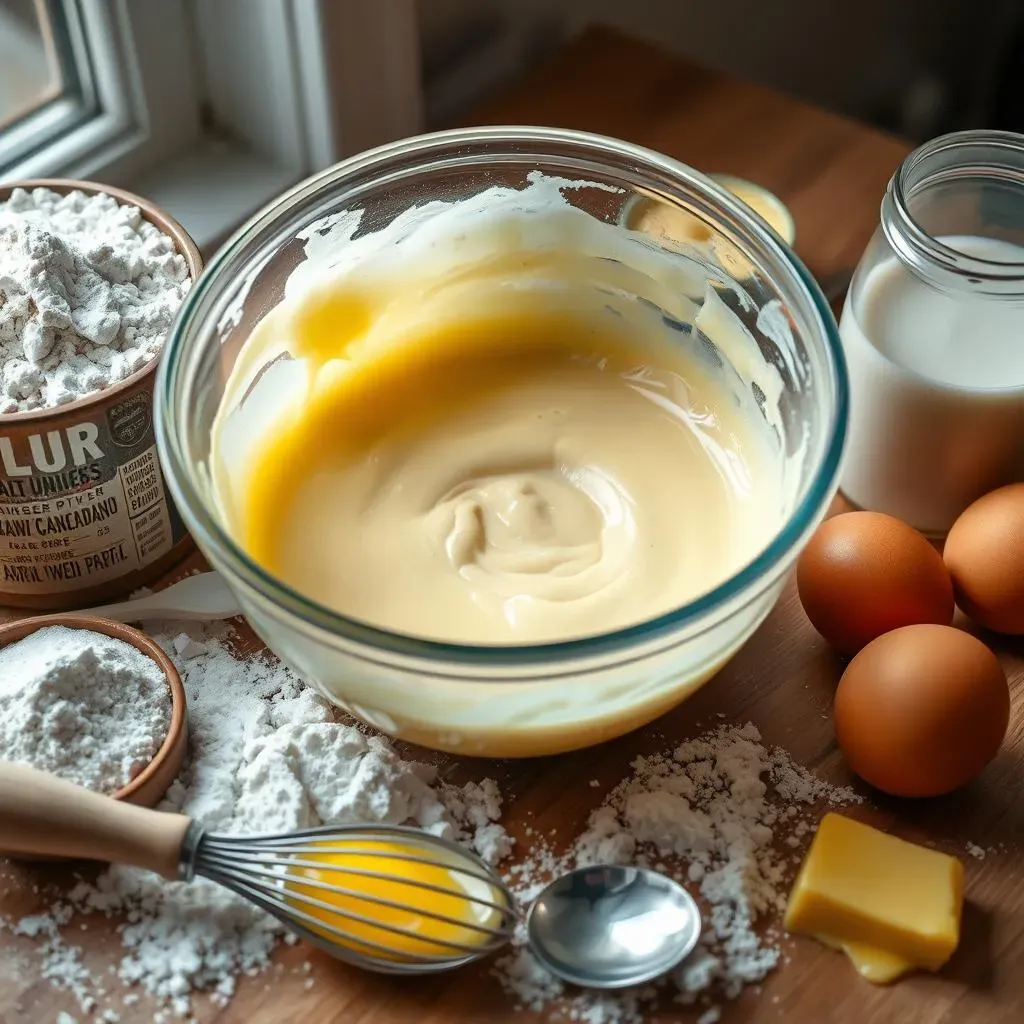
Alright, now that you've got your griddle situation under control, let's talk batter. This is where the magic truly happens, and it's not as complicated as you might think. The key is to aim for a smooth, pourable consistency, not too thick and not too thin. Think of it like a thick cream, it should flow nicely off your spoon. Now, you'll often see recipes that say "don't overmix". What does that even mean? It means don't go crazy with the whisk! Overmixing develops the gluten in the flour, which will give you tough, chewy pancakes instead of light, fluffy ones. You want to mix just until the dry ingredients are incorporated into the wet ingredients. A few lumps are perfectly fine, and actually, they’re desirable. It’s better to have a few lumps than a batter that's been worked too hard.
The order you add ingredients also matters. I like to combine all my dry ingredients, like flour, baking powder, sugar, and salt, in one bowl. Then, in a separate bowl, I mix all the wet ingredients, like milk, eggs, and melted butter or oil. Then, I gently fold the wet into the dry. Folding is the key, not stirring. You just want to bring everything together without beating the life out of it. If you're curious about using different flours, you might find this article on whole wheat flour pancakes interesting. It explores how that can change the texture and taste.
Also, let your batter rest for a couple of minutes after you've mixed it. This allows the baking powder to fully activate and gives you extra fluffy pancakes. It's like a mini spa day for your batter. While you are waiting, you can prepare your toppings. If you're looking for inspiration, this guide on pancake toppings is packed with ideas. Resting also helps the gluten relax, which contributes to that tender texture we're all after. So, be patient, let your batter chill for a sec, and get ready for some serious pancake deliciousness.
Griddling Techniques for Golden Brown Pancakes
Griddling Techniques for Golden Brown Pancakes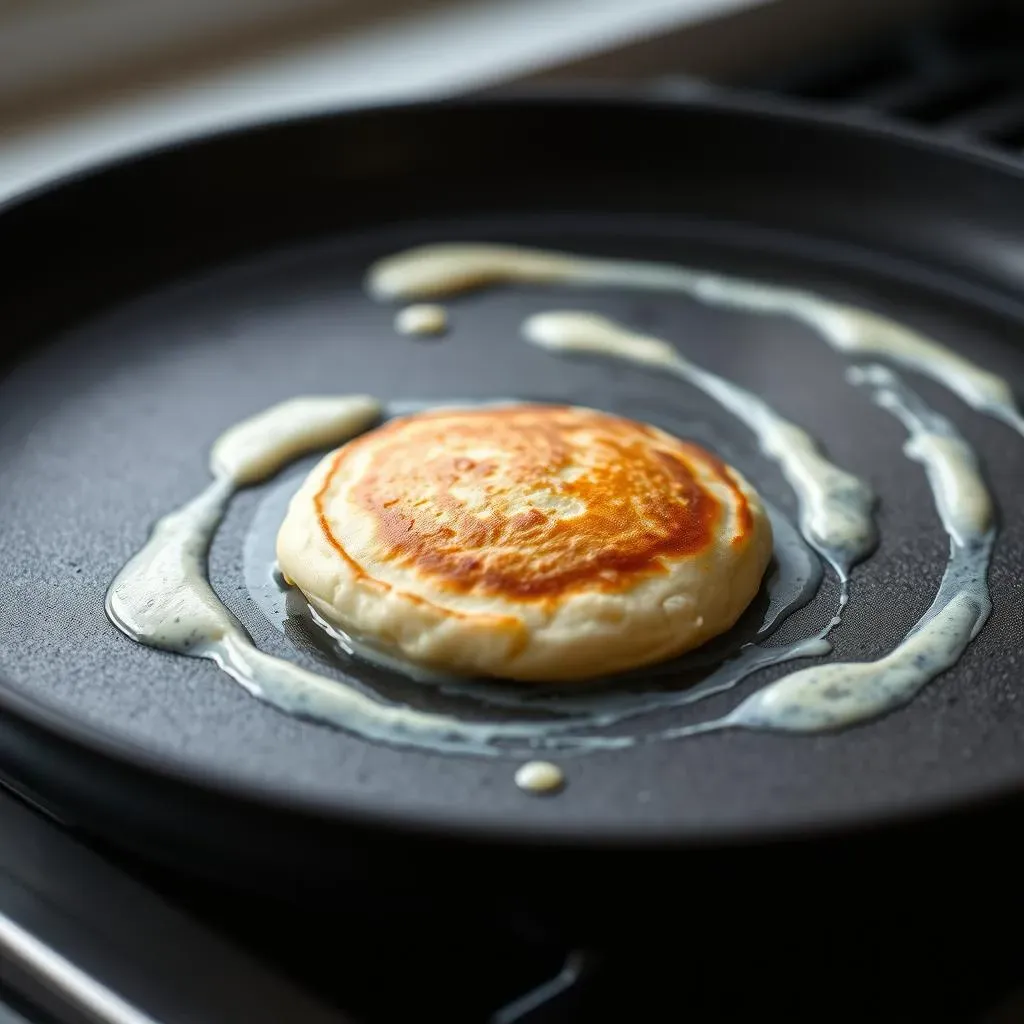
The Art of the Pour
Okay, so your batter is ready, your griddle is hot, now what? It's time to pour! But how you pour your batter onto the griddle is surprisingly important. Don't just dump a big blob in the middle. Instead, use a measuring cup or a ladle to pour a consistent amount of batter onto the hot surface. I usually go for about a quarter cup for each pancake. This helps them cook evenly and look uniform. Think of it like painting, you want nice, even strokes, not splatters. And make sure you give each pancake a little space, don’t crowd them. If you're aiming for perfectly round pancakes, pour the batter in a single, circular motion from the center. This helps keep them from spreading out into weird shapes. This might sound like a small thing, but it makes a big difference. If you are cooking for kids, you might want to check out this easy pancake recipe for kids , it has some neat tips for making breakfast fun for them.
Once the batter hits the griddle, resist the urge to poke, prod, or flip it right away. Let it cook for a couple of minutes, undisturbed. You’ll start to see little bubbles forming on the surface and the edges will begin to look set. These bubbles are your sign that the bottom is cooking properly. It's like the pancake is sending you a little message saying, "Hey, I'm almost ready!". If you start flipping too early, you will have a mess. If you're not sure about the heat, you can always do a test pancake first. Just pour a small amount of batter and see how it cooks. It is better to learn with a tiny pancake than to ruin a whole batch. If you are not sure about the heat, you might want to check out this pancake cooking tips, it has a lot of good information about heat control.
The Perfect Flip
Now, the moment of truth: the flip! This is where many people get nervous, but it's really not that scary. The key is to be confident and quick. Use a thin spatula, slide it under the pancake, and then flip it over in one smooth motion. Don’t hesitate! Hesitation is your enemy here. If you flip too slowly, you may end up with a broken pancake. A good flip will give you a perfectly cooked second side. The second side usually takes less time to cook than the first, so keep an eye on it. You want it to be golden brown, but not burnt. It’s like a delicate dance, you need a little finesse. If you're looking for a recipe that uses melted butter, this pancake recipe with melted butter is a good one to check out.
If your pancakes are sticking, it could be a sign that the griddle isn't hot enough or that you didn't grease it properly. No worries, you can always adjust! If you are having trouble with this, check our pancake troubleshooting guide. Also, remember that different griddles can behave differently. A cast iron skillet will retain heat better than a non-stick pan, so you may need to adjust your cooking times accordingly. It's all about getting to know your equipment and adapting as you go.
Pancake Cooking Issue | Possible Cause | Solution |
|---|---|---|
Sticking to the griddle | Griddle not hot enough, not enough grease | Increase heat, add more butter or oil |
Burnt exterior, raw middle | Heat too high | Reduce heat, cook longer on lower heat |
Uneven cooking | Uneven heat distribution, wobbly pan | Use a flat griddle, adjust heat as needed |
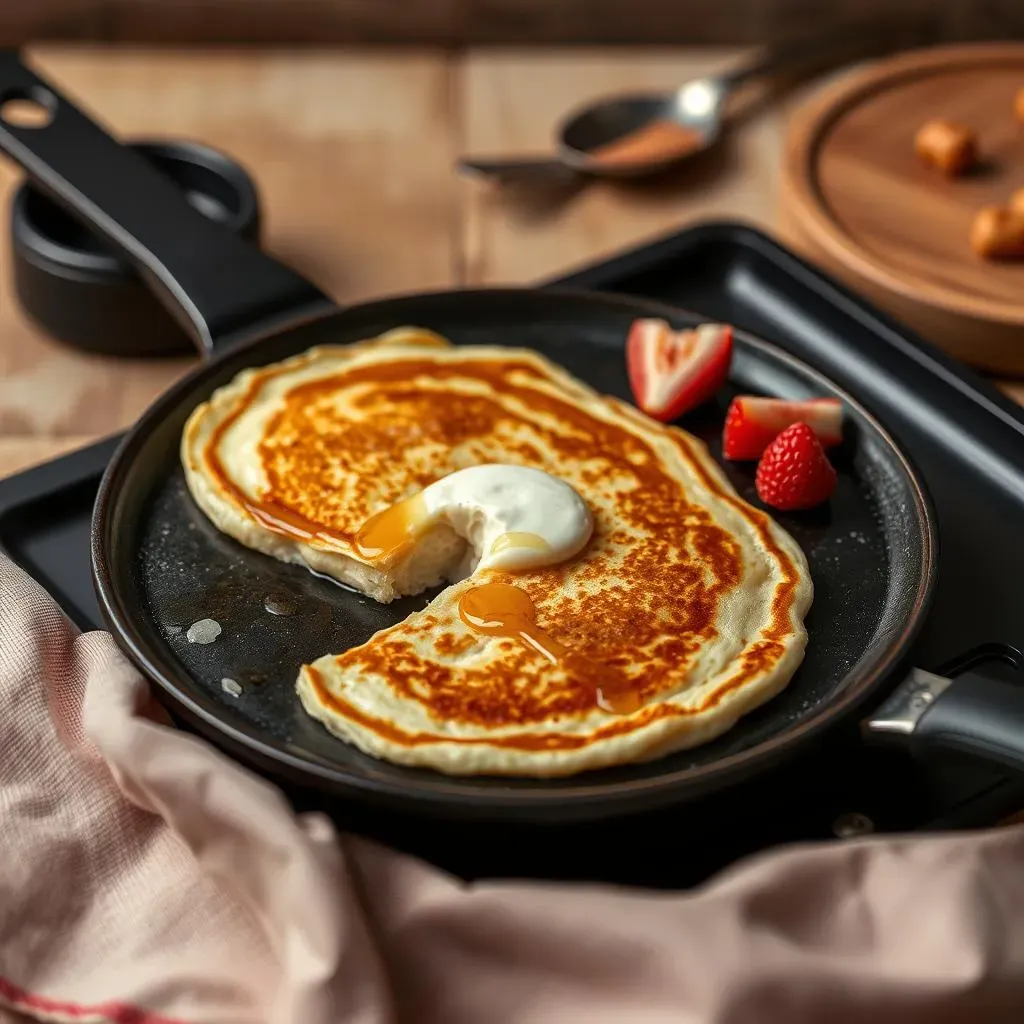
Achieving the Golden Brown
The goal here is to get that beautiful golden-brown color on both sides. It's not just about looks; that color indicates that the pancake is cooked through and has a slightly crispy edge. It's the perfect balance of soft and crunchy. Once you flip the pancake, you don't need to cook it as long as the first side, usually just a minute or two. You will see the color changing and that is what you are looking for. If you are using different flour, you might want to check out this classic pancake recipe with all purpose flour.
Don’t be afraid to experiment a little with the heat, but keep an eye on those pancakes. The color is your guide, so adjust as needed. Remember, patience is key. Rushing the process can lead to undercooked or burnt pancakes. Once your pancake is golden brown on both sides, it's time to take it off the griddle and get ready to enjoy! If you want to see how to make a big batch, check out the classic pancake recipe for a crowd.
Serving and Enjoying Your Classic Griddle Pancakes
Serving and Enjoying Your Classic Griddle Pancakes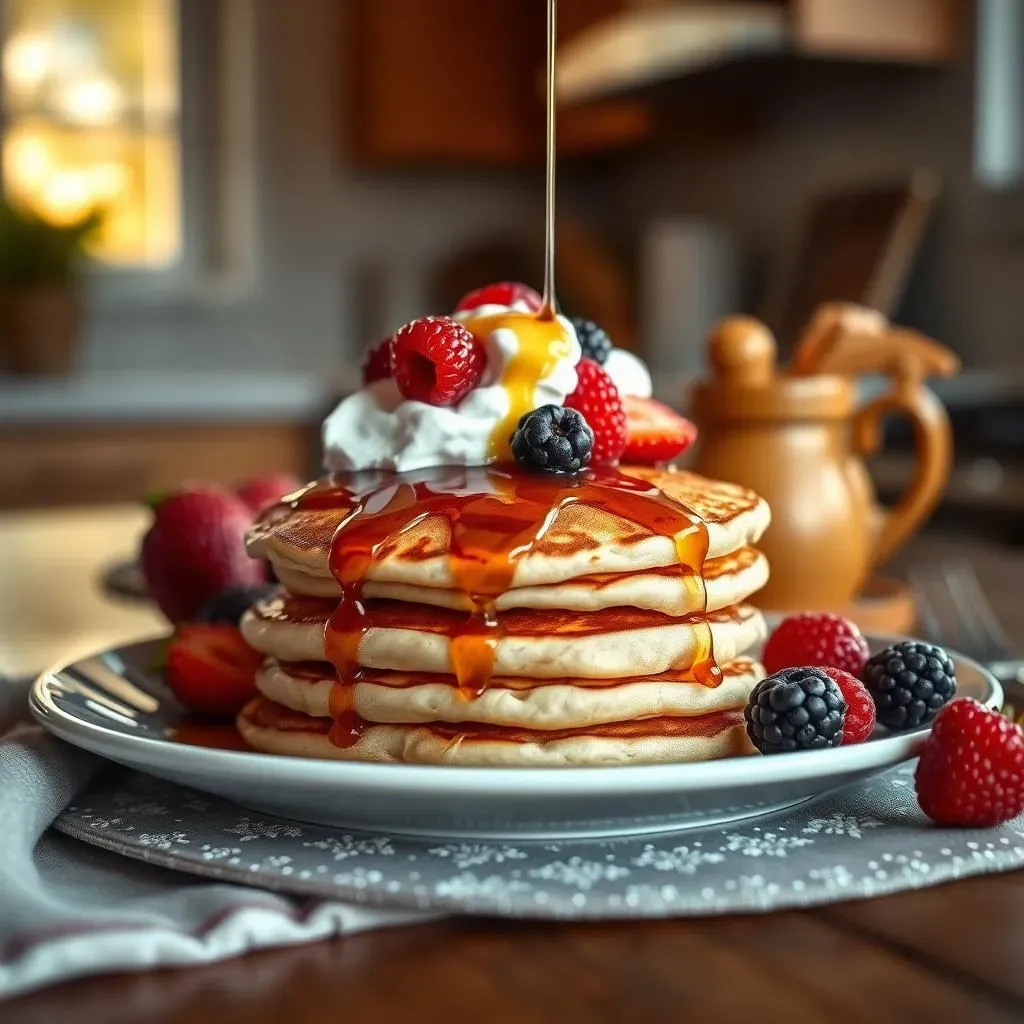
Okay, so you've flipped your final pancake, the kitchen smells amazing, and now it's time for the best part: eating! But before you dive in face-first, let's talk about how to serve and enjoy your classic griddle pancakes. First things first, keep them warm! You can stack the cooked pancakes on a plate and cover them loosely with foil to retain the heat. If you're making a big batch for a crowd, you can even place the plate in a warm oven (set to the lowest temperature) for a few minutes. This helps to keep the pancakes warm and fluffy until everyone is ready to eat. Nobody wants a cold pancake. Think of it like a little pancake spa, keeping them nice and cozy. If you are cooking for one, you might want to check out this pancake recipe for one.
Now, for the toppings! This is where you can really get creative. The classic combo of butter and maple syrup is always a winner, but don't be afraid to experiment. Fresh berries, whipped cream, chocolate chips, chopped nuts, even a sprinkle of cinnamon can elevate your pancakes to a whole new level. Think of your pancakes as a blank canvas, ready for your artistic touch. You can even create a topping bar, with different bowls of fruit, syrups, and other goodies, and let everyone customize their own pancakes. If you are looking for different variations, check out this pancake recipe variations. You can also try different syrups, like honey or agave, for a different flavor profile.
Topping Idea | Why it Works |
|---|---|
Fresh Berries | Adds sweetness and a burst of freshness |
Whipped Cream | Adds richness and a light, airy texture |
Chocolate Chips | Adds a touch of decadence and fun |
Chopped Nuts | Adds crunch and a nutty flavor |
Maple Syrup | Classic pairing, provides sweetness and moisture |
Don't forget about the sides! A side of crispy bacon, sausage, or even some fresh fruit can complete your breakfast feast. And if you're feeling adventurous, why not try a savory pancake? Top your pancakes with a fried egg, some avocado, or a dollop of sour cream for a delicious twist. Pancakes aren't just for breakfast, you can enjoy them any time of the day. If you want to make it for brunch, you might want to check out this pancake recipe for brunch. The key to enjoying your pancakes is to have fun with it! Experiment with different toppings, try new combinations, and most importantly, share them with the people you love.
So, there you have it, your classic griddle pancake journey is complete! From prepping your griddle to mixing the perfect batter, mastering the flip, and finally serving up a delicious breakfast, you've learned all the secrets. Now go forth, and make some amazing pancakes! And don't be afraid to experiment and have fun in the kitchen. If you are looking for a simple recipe, check out this pancake recipe with simple ingredients. Remember, practice makes perfect, and even if your first batch isn't perfect, you'll get better with each attempt. Happy griddling!
Wrapping Up Your Griddle Adventures
So, there you have it – a complete guide to creating truly exceptional pancakes using a griddle. From prepping your equipment to mastering the batter and the cooking process, you now possess the knowledge to turn simple ingredients into a breakfast masterpiece. Remember, practice makes perfect, so don't be discouraged if your first batch isn't flawless. Keep experimenting, try different toppings, and most importantly, enjoy the process of creating something delicious. Whether you’re making them for a lazy weekend brunch or a quick weekday breakfast, these griddle pancakes are sure to bring smiles to your table. Now, go forth and conquer that griddle! And maybe check out our guide on a classic pancake recipe with simple ingredients for more ideas!